
This blog was last updated in October 2022.
Plesk is the all in one tool for running websites and applications in the cloud. From a web developer to a system integrator to a web hosting provider, everyone stands to gain from the relevant functionalities that Plesk provides them with.
Developers can focus on coming up with new and improved applications, without worrying about the underlying infrastructure. To add to its dynamic functionalities, Plesk Onyx – the latest version, introduces advanced possibilities for developers and other web professionals. It allows them to build and run powerful, secure applications with features like Git integration and Docker support.
Talking about Docker– it is one of the fastest growing and most successful open-source platforms for containerizing distributed applications.
Read details in a report by IDC.
Plesk has Docker installed as a component, allowing you to run as well as manage containers based on particular Docker images, so as to use it not only on local host but also on defined remote machines. As a Plesk extension, Docker support includes:
- Access to a variety of modern technologies like mongodb, redis, memcached and others.
- Direct deployment of Docker containers and its management from Plesk interface.
- Easy and direct installation to any local or a node registered in Plesk.
- Availability of a wide range of Docker images, with an option to upload custom images.
Management of Docker Containers and running an application in it with Plesk:
With Plesk Docker extension, one can easily deploy and manage Docker containers and run web apps in it.
Docker containers are built on the sharing concept. Here, each container shares the underlying resources of the Docker host. What developers do, is build a specific image of their application, and scale per the requirement.
#Using Docker
Docker extension is free with Plesk. Select it while installing Plesk. In case, you didn’t do it, enable it by going to:
Home > Tools & Settings > Updates & Upgrades.
On the left hand side navigation, move to Docker and begin using it.
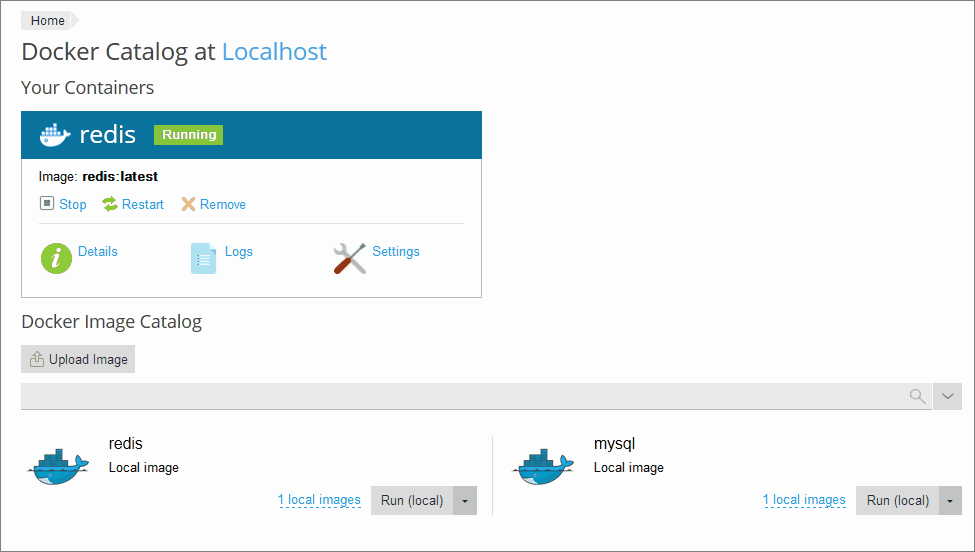
#Image catalog
Go to Docker > Docker Image Catalog.
Here, Plesk will display the default images from https://hub.docker.com/explore. You can search/filter more images from Docker hub using the icon located near the search box. Enter the image name or repository to find the required image.

#Run containers
After selecting the specific Docker image:
1. Select the application version, if you want to run a specific version by clicking the arrow next to Run button.
2. To run the latest version, directly click Run. (Images stored locally will have Run(Local) on the button)
Plesk allows you to define certain container settings, before running it:
For modifying container settings, go to Settings or Details > Settings.
a) Automatic start after System Reboot
By selecting automatic start after system reboot for your container, you ensure that the websites that use it will work 24×7, without any manual operations needed.
b) Automatic port mapping
By default, this option is turned on. This means the internal port of the container will be mapped to some random port on the host system.
To change this port, unselect the checkbox and specify any external port per your requirement.
c) Volume mapping
With volume mapping, you can have your data stored in a safe place outside the container, so that even if the container is deleted, the data will be still available. This is one of the best practices of Plesk. It is ideal for WordPress hosting also, as it is one of the required features during site migration.
Specify the following on the volume mapping setting:
- In the first (left) box – specify the server directory path that needs to be mounted in the container.
- In the right box – mention the directory path inside the container.

3. The created container will be displayed in the containers’ list found at the top of the Docker catalog page.
You can also change the configuration settings after the container has been created. Plesk will recreate the container with the new settings.
#Managing Containers
- You can “Stop”, “Restart” or “Recreate” containers.
- You can view details like resource consumption and logs.
- Change container settings per the requirement.
- Easily recreate any container using the same image or through a new image.
- Take container snapshot (Details >> Download a container).
- You can also remove containers.
Recreating Containers
You need to recreate containers when you update the application to its newer or any other version. You should specify Volume mapping before recreation to preserve the data.
To recreate a container:
- Go to Docker and select Details below the particular container you want to recreate.
- Here, select Recreate in container settings. Mention the image version and also specify if default environment variables are to be used.
Using Remote Docker
By default, Plesk makes use of Docker which is installed as a component of Plesk. But you can also use one or more services of Docker outside the Plesk (Only one at a time). However, that requires you to purchase Plesk license key as an add-on.
You need to configure this remote server before using it in Plesk.
Using a remote Docker service (Both for Linux and Windows):
- In Tools & Settings, select Docker under Server Management.
- Select Add Server and specify the settings.
- Select “Set Active” to start using this remote service.

#Managing Local Images
Local images are already available in the catalog, so you don’t need to specially download them. These images are saved when you select any version or tag of an image and either run or cancel it. Plesk gives you the option to upload the image as well, in the image catalog. Images built using the command line interfaces also appear here.
All custom created images are also saved locally in the catalog itself. (See next section to know how to create custom images.)
#Creating Images with Custom settings
When you make any changes to the container, you can click on the save as image option. By doing so, the system will take a snapshot of the changes, and it will be displayed as a new image.
You can further specify the name and version of the image. By default, the system generates a new name for the image and also downloads the latest one only.
Thus, creating applications and running it in Docker container is quite easy, all thanks to Plesk!
Limitations
- Plesk supports Docker for these operating systems: RedHat 7, CentOS 7, Ubuntu 18.04, Debian 9, AlmaLinux 8.x, and Rocky Linux 8.x. For Windows, you can install Docker on a remote machine. Docker can be used only on x64 systems.
- Plesk does not support Docker for Windows Server 2008.
- Plesk does not allow you to use Docker which is deployed in a Docker container.
- To use Plesk’s remote Docker services, you need to have an additional license. You can purchase it separately or as a part of hosting pack, power pack, or developer pack.
- Docker containers cannot be migrated or backed up in Plesk. However, it allows you to back up the data used by the containers (see Volume Mapping below), or download snapshots.
- Virtuozzo 7 is supported with Update 1 Hotfix 1 (7.0.1-686) or a later version. Note that with this update, new containers based on CentOS 7 are built with a firewall enabled by default for better security. The Plesk administrator needs to manually configure the firewall. This will ensure that the ports required for the operation are open.
ZNetLive offers Plesk Onyx with its services like Cloud VPS, Dedicated server and WordPress hosting. By doing so, we ensure that our customers get the latest technologies to work upon.
Read details in a report by Forrester.
If you have any further queries relating to this article, please share them through our comments section below. Our experts would be more than happy to assist you.
Services ZNetLive offer:

