
In today’s fast-paced business world, staying connected and organized is key and that’s exactly where Microsoft Outlook shines. From managing emails and calendars to scheduling meetings and keeping tasks on track, Outlook empowers professionals to streamline communication and boost productivity effortlessly. And when it comes to making a lasting impression, Outlook’s email signature feature plays a crucial role, helping you maintain brand consistency, share essential contact details, and present a professional image with every message you send.
Microsoft Outlook is available on multiple platforms – web, desktop, and mobile, each providing different ways to add a personalized email signature. This blog explains how to create, add and update email signatures in Outlook as of the latest update. Let’s begin!
How to set up signature in Outlook Mail on Windows
Microsoft Outlook for Windows is a comprehensive personal information manager designed to streamline communication and enhance productivity. It integrates email, calendar, contacts, tasks, and notes into a unified platform, making it ideal for both personal and professional use.
With features like Focused Inbox, customizable rules, and seamless integration with Microsoft 365 apps such as Teams and OneDrive, Outlook ensures efficient email management and collaboration. The application supports various email protocols, including IMAP, POP3, and Exchange, allowing users to connect multiple email accounts. Its strong security measures, including encryption and phishing protection, safeguard user data.
Additionally, Outlook offers cross-platform accessibility, enabling users to stay connected across devices. Whether scheduling meetings, managing tasks, or organizing contacts, Outlook provides a versatile solution for staying organized and connected.
To add a signature in Outlook, follow the steps below:
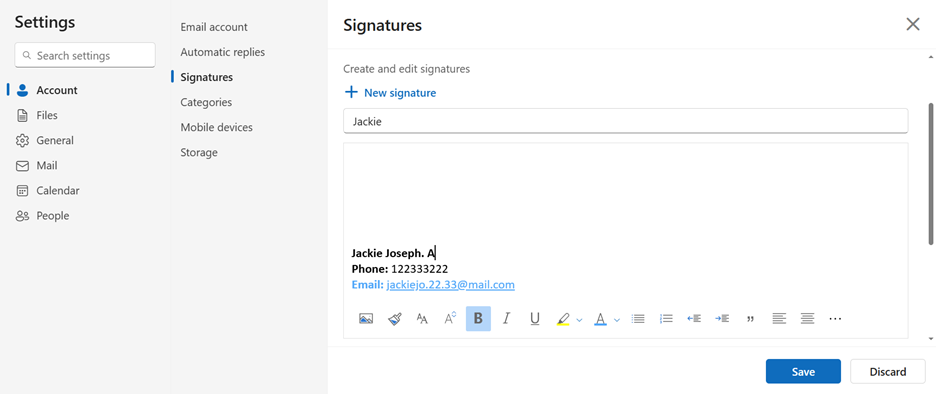
Source: Outlook.com web and application
1. Access Settings: Click the settings icon in the top-right corner of Outlook.com.
2. Account: At the top of the Settings pane, select Account.
3. Add Your Signature: In the Account section, Choose the signature option, add a new signature. You can format the text, add images, and include links as needed.
4. Set Signature Defaults: Below the signature editor, you can choose to automatically include your signature on new messages and/or replies and forwards by checking the appropriate boxes.
5. Save Changes: After configuring your signature, click Save to apply the changes.
6. Edit: You can also edit or rename and even delete old signatures if you wish to.

Source: Outlook.com web and application
If you prefer to add your signature manually to individual emails, you can do so by composing a new message, then selecting Insert > Signature from the message toolbar.
How to set up signature in Outlook Mail on Mac
Microsoft Outlook for Mac is a robust email and productivity application tailored for macOS users. It seamlessly integrates email, calendar, contacts, and tasks into a unified interface, facilitating efficient communication and organization. The application offers features such as a customizable toolbar, improved search capabilities powered by Microsoft Search, and the “My Day” view for quick access to daily schedules.
Additionally, users can benefit from functionalities like scheduling emails, Focused Inbox to prioritize important messages, and the ability to undo sent emails. Outlook for Mac is designed to enhance productivity and streamline daily tasks for both personal and professional use.
To add a signature in the Outlook app for Mac (as of the 2024 update), follow these steps:
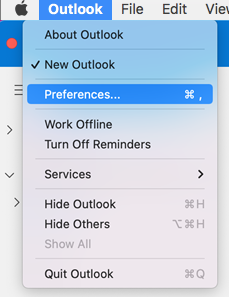
1. Open Outlook: Launch the Outlook application on your Mac.
2. Access Preferences: In the top menu bar, click on Outlook, then select Preferences.
 Source: Microsoft Support
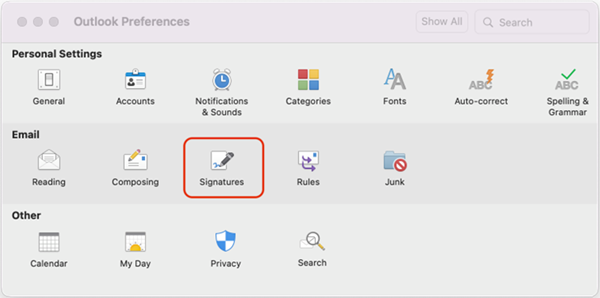
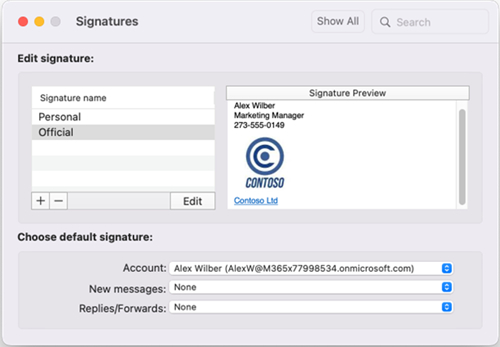
3. Open Signatures: Under the Email section, click on Signatures.
 Source: Microsoft Support
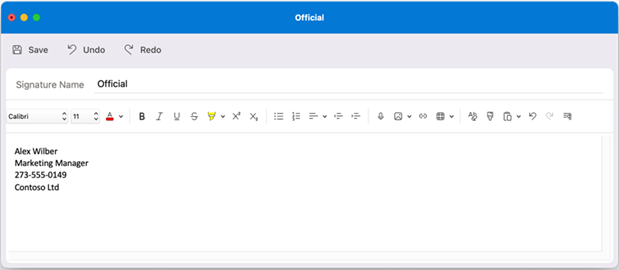
4. Create a New Signature:
- Click the “+” button to add a new signature.
- Enter a name for your signature in the Signature Name field.
- In the editing box, type and format your signature as desired.
Source: Microsoft Support
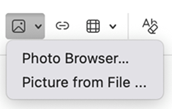
5. Add an Image (Optional): To include an image or logo, click on the Insert Picture icon (it looks like a photo). Choose the image file from your computer.
Source: Microsoft Support
6. Set Default Signature: Under Choose default signature, select the email account you want to associate with this signature. Use the dropdown menus to assign the signature for New messages and Replies/forwards.
7. Save and Close: Once you’ve configured your signature, click Save. Then, close the Signatures window.
Your new signature will now automatically appear in your emails based on the settings you’ve chosen.
Power up business communication with Outlook from ZNetLive
Microsoft Outlook is a key application of the Microsoft 365 suite and offers a comprehensive solution for managing emails, calendars, contacts, and tasks. Whether you’re in the office or on the move, Outlook ensures you stay organized and connected.
Why Choose ZNetLive for Microsoft 365 solutions?
- Tailored Plans: Options suitable for businesses of all sizes
- Expert Support: 24/7 assistance from Microsoft-certified professionals
- Seamless Migration: Assistance in transitioning to Microsoft 365 with minimal downtime
- Flexible Billing: Multiple payment options to fit your budget
Ready to elevate your business communication?
Explore the Microsoft 365 plans offered by ZNetLive and find the one that best suits your business needs. Contact us today!
Read next: Quick Guide on How to Create or Change a Signature in Gmail
