Today, WordPress has become the most popular Content Management System (CMS) in the world. It is used by more than 74 million sites to publish new content every second. It was first set up mainly for bloggers and now it is used to build website of any size. There are a number of Web hosting providers to host your WordPress site/blog. Many of them offer free WordPress hosting services also. Choosing the best can improve your SEO and increase your sales.
Read details in a report by Forrester.
WordPress – a quick introduction:
As per wiki, “WordPress is a free and open-source content management system (CMS) based on PHP and MySQL”.
There are a number of reasons why WordPress is ideal CMS for your business website. It is:
- Free
- Flexible
- Open source
- Safe and secure
- Customizable
- Easy to use and manage
It can be easily installed on a web server which can be a part of an internet hosting service or may be the host itself. And when you move it to a new server or to a different location on your server, you don’t need to reinstall it. WordPress is flexible enough to handle all these situations.
In this blog, we will discuss, how to migrate your wordpress website from one hosting server to another server.
Managed Alibaba Cloud
Cheaper, Faster & Secure Cloud Hosting
Steps to transfer your WordPress website from one host’s server to another:
If you are moving your WordPress site from one server to another, begin by backing up your WordPress directory, plugins, and other files on your site as well as the database.
Step 1: Back up your website’s files
It is the basic requirement of migrating your WordPress installation.
If your website content is in public_html (in case of cPanel) or if WordPress is installed in any sub-domain, you have to take backup with zip or you can also copy all contents via FTP (Filezilla) to your local system.
Refer the screenshot. In this case, our data is in ‘wp’ folder:
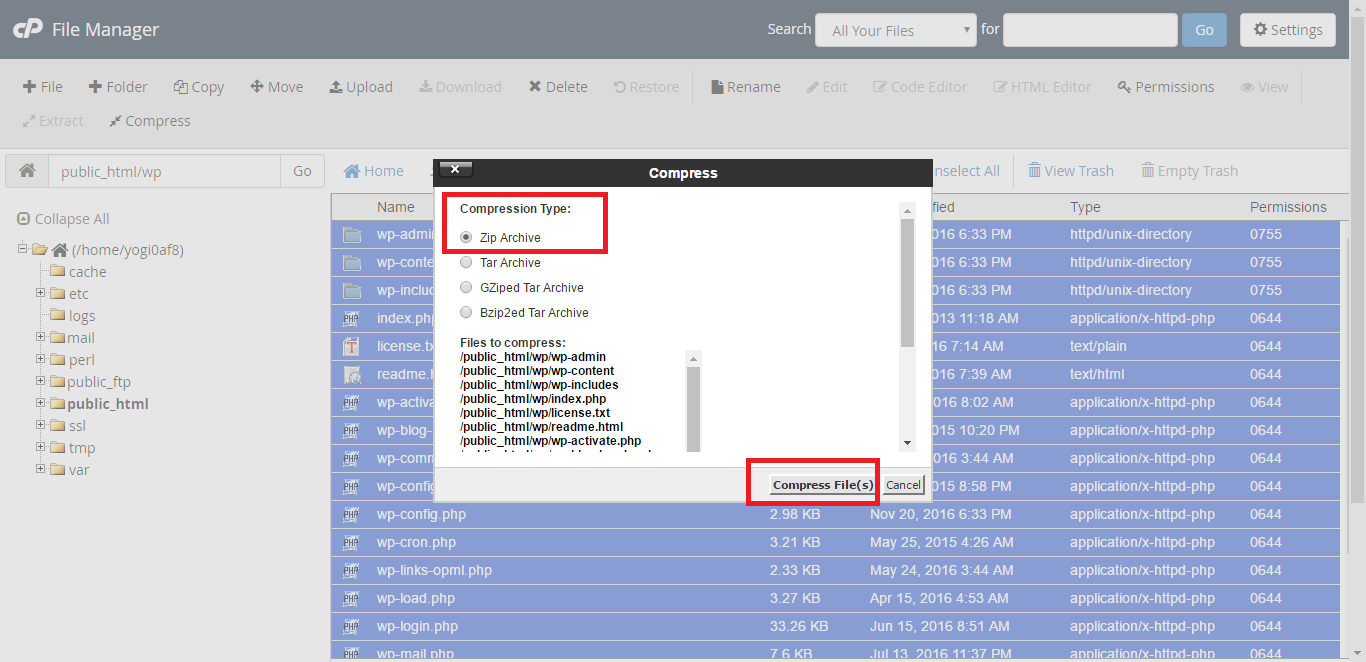
After completing this, a zip file will be generated in the same directory. We can also download this backup on our local system.
Step 2: Backup your databases
As we are all aware that the database is the heart of WordPress and without database, we can’t use it. We can take the database backup from “php myadmin” or from shell access.
For this, we have to log into cPanel and then go to ‘php myadmin’. Select the database and click on ‘Export’.

Choose the format as “SQL” and generate the database backup.

Now a popup will show to download this backup in .SQL format.
#for taking backup from shell:
- mysqldump -uadmin -p`cat /etc/psa/.psa.shadow` database > database.sql//for plesk
- mysqldump database_name > database.sql //for cpanel
The data content and database backup have been completed.
Step 3: Prepare for migrating all data and databases to new server
Now it’s time to move or migrate all data to the new server.
- Upload all the data content in the public_html or in sub-folder where you have WordPress. You can upload the data via FTP or you can upload the data backup in the directory and extract it.
- Now, we will import the database backup for this:
- Create a database and database user and assign all privileges to the same.
- Please make sure that the prefix of database must be same as was there in the old server. It would be helpful to export the database easily or without any error.
- After creating the database, open the “php-myadmin” and click on ‘Import’.

Now select the backup file from your local system and click on ‘Go’.

We can also restore database backup from shell:
- mysql -uadmin -p`cat /etc/psa/.psa.shadow` database_name < database.sql //Plesk
- mysql database < database.sql //cPanel
We have migrated all the data content and databases to a new server. Now, we will do some required changes to make this migration complete.
Step 4: Edit the wp-config.php file
wp-config.php controls the access between WordPress and your database.
If the database and database user name is same as was there in the old server, there is no need to update the wp-config file.
Else, we will change the following details in wp-config file:
- define (‘DB_NAME’, ‘write the database_name here’);
- define (‘DB_USER’, ‘write the database_user_name here’);
- define (‘DB_PASSWORD’, ‘write the DB_password here’);
Step 5: Redirection setup
To transfer your old domain’s SEO to the new one, it’s important that you set up a 301 redirect as follows:
You can use default .htaccess WordPress file:
# BEGIN WordPress
IfModule mod_rewrite.c
RewriteEngine On
RewriteBase /
RewriteRule ^index\.php$ – [L]
RewriteCond %{REQUEST_FILENAME} !-f
RewriteCond %{REQUEST_FILENAME} !-d
RewriteRule . /index.php [L]
/IfModule
# END WordPress
To update your permalinks, go to Settings > Permalinks, select the permalinks structure which you want and Save Changes.
Some Useful Tips:
- Caching Plugins: Some caching plugins may modify your .htaccess or create a new .htaccess file to absolute paths that may not exist on your new hosting setup.
- Google reCaptcha Plugin: If you have any Google reCaptcha plugins installed, get the new API key for your domain, so that you will not find any difficulty in displaying the reCaptcha.
Now, we have successfully completed the migration.
Read details in a report by IDC.
Feel free to ask any question regarding this through the comment section below.
Services ZNetLive offer:

Thank you for sharing such a nice and informative Blog.