
Control panel cPanel or Web Host Manager (WHM) is a powerful and easy to use control panel that offers automation and GUI to simplify the management of web hosting. It enables one to manage and operate his Linux web hosting servers, databases, mail accounts, applications, security, FTP and more. Users can quickly accomplish their tasks using helpful web based interface of cPanel.
Prerequisites to Configure cPanel & WHM: Network and hardware requirements
Network requirements

Hardware requirements

cPanel installation script
cd /home && curl -o latest -L https://securedownloads.cpanel.net/latest && sh latest
It will take approximately 45 to 60 minutes to install WHM/cPanel on the server. Following complete installation, here’s what you need to do to access the WM:
How to access the WHM?
WHM listens on the port number 2086 and 2087 securely, so it’s recommended that it be accessed on these port numbers.
http://ip-address:2086 — OR – https://ip-address:2087/
You may get SSL warning, accept it and save certificate in browser so that it’s not repeated every time.
Now enter the username as ‘root’ and password same as what was set initially during OS installation. There will be six initial steps to proceed further:
- Initial setup: WebHost Manager End User License Agreement has to be accepted.
- Setup Networking: Enter the contact information and set hostname with below command in shell.
/usr/local/cpanel/bin/set_hostname
Also setup the resolver and enter the DNS server’s IP address.
Warning : Set a reliable resolver here as your setup entry will be shown in file /etc/resolve.conf
- Setup IP Addresses: Enter IP address with proper subnet mask and gateway.
- Name server Configuration: In this section, we’ll configure the name server. Nameserver populates your server’s DNS information by the Internet to allow users to access website from your server.
- Services: In this section, we configure the services which are used by our clients on the server, including:
- FTP Configuration
- Mail Configuration
- cPHulk Brute Force Protection configuration.
Install a Common Set of Perl Modules- the most beautiful thing provided by cPanel.
- Setup quotas: This is the final stage of the Initial Setup process. This allows you to select if you wish to track/monitor disk usage on your server.Now initial setup has been completed and now we’ll setup WHM and configure some tweaking:
- Home »Server Configuration »Server Time: Setup your country time zone as per your location.

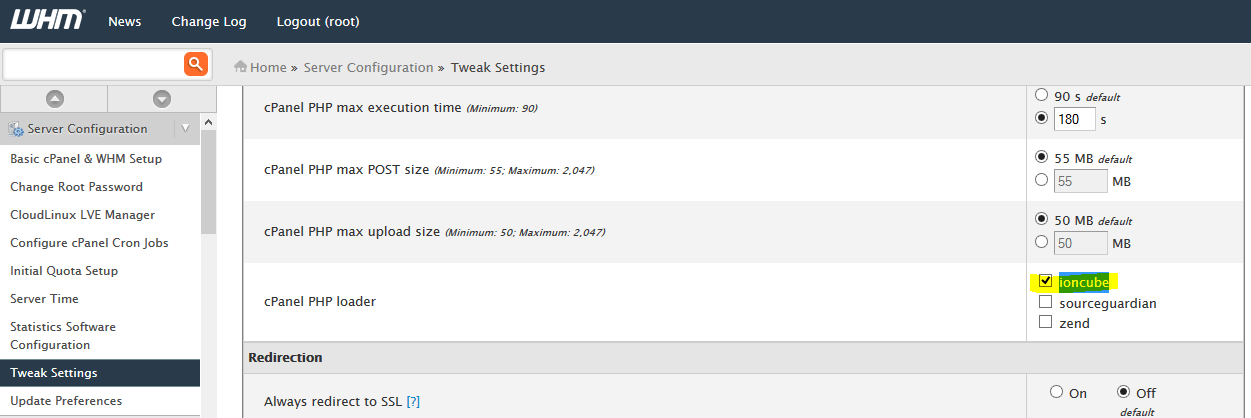
- Home »Server Configuration »Tweak Settings: Next we’ll configure some tweak setting and security settings in WHM.
- Enable ioncube on the server if required, because it’s prerequisite need of Softaculous.
- Setup mail sending limits

- Prevent nobody from mail sending

- Enable ioncube on the server if required, because it’s prerequisite need of Softaculous.
- Home »Security Center »Compiler Access: Disable the compiler access on the server for security reasons.

- Home »Security Center »cPHulk Brute Force Protection: Enable the cPHulk protection on the server to protect from DDoS like attacks.

Note: After enabling cPHulk on the server, first allow or whitelist your IP in cPHulk, otherwise if you are blocked, you will be restricted from accessing cPanel.
- Home »Security Center »Shell Fork Bomb Protection: Enable shell fork bomb protection in WHM.

- Home »Security Center »SSH Password Authorization Tweak: Here we can setup SSH key based authentication and disable password based login if required. This will protect our server better.

- Home »Service Configuration »Apache Configuration »Global Configuration: Setup all the apache global configuration here- we can setup limit on the number of connections, maximum retry and number of active user limits here.

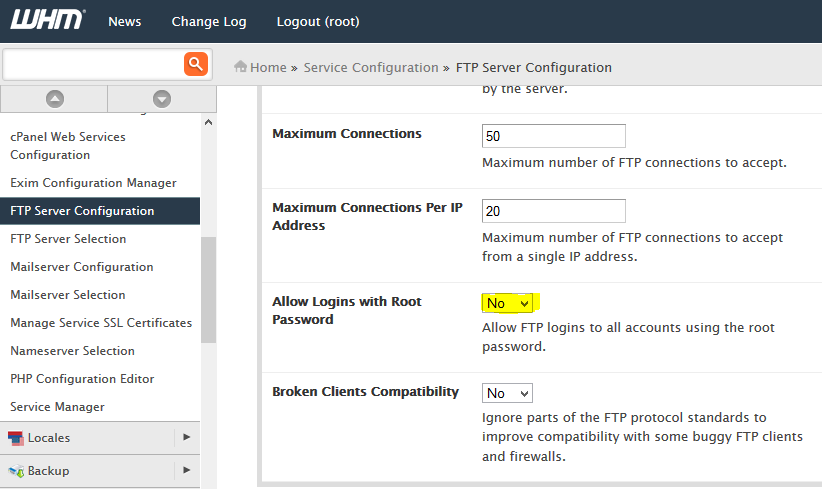
- Home »Service Configuration » FTP Server Configuration: In FTP server configuration tab, we can setup FTP server configuration. We should prevent ‘root’ user from accessing FTP.
- Home »Service Configuration »PHP Configuration Editor: PHP configuration related tweaking changes from PHP configuration editor option can be done here. We can setup limit on parameters like upload_max_filesize, memory_limit, disable_functions etc.

Using above steps, we can setup our WHM securely on the server.
Services ZNetLive offer:
Let me know if I missed anything using comments below.

What is the maximum value for the FTP Server Configuration
There is no limit defined by cPanel and users can increase it via WHM panel. It depends on the load and server resources to make sessions between user and server.