
MySQL is the most famous Open Source SQL DBMS (Database Management System) that’s developed, circulated, and supported by the Oracle Corporation. It’s fast, reliable, easy to use, scalable relational DBMS. Its version MySQL Server 5.5 was made generally available in December 2010.
It had a number of features and enhancements over previous versions, including InnoDB as default storage option, better I/O subsystem, SMP support, semisynchronous replication, user- defined partitioning, support for Unicode character sets utf16, utf32, and utf8mb4 and SIGNAL and RESIGNAL statements complying with the SQL standard.
Version MySQL 5.6 was made generally available in February 2013. It included a number of new features like improved query optimizer performance, higher transactional output in InnoDB, better partitioning to query and manage huge tables, improved replication, new NoSQL-style memcached APIs, TIMESTAMP column type with ability to store milliseconds correctly, and better performance monitoring with PERFORMANCE_SCHEMA. The InnoDB storage engine also had better group commit performance and included full-text search support.
The newest version MySQL 5.7 has been made generally availabile from October 2015. But, it’s not in community edition. So, here we will guide how you can upgrade your MySQL 5.5 version to 5.6 version.
Read details in a report by IDC.
For installing the MySQL database via yum – the CentOS package manager, please follow the below steps of running commands in command prompt:
Step1: yum install mysql-server
Step2: Check the MySQL version

which is: mysql Ver 14.14 Distrib 5.1.73, for redhat-linux-gnu (x86_64) using readline 5.1
Step3: Need to harden the MySQL server
Run the mysql_secure_installation script to address several security concerns in a default MySQL installation.

Step4: After the secure installation, now enter in MySQL using the below command:
mysql -u root -p
Step5: Use quit to quit from MySQL

Now for upgrading the MySQL from 5.1 to 5.6, first we need to upgrade in MySQL 5.5
For upgrading in 5.5, need the remi and epel repository.
wget https://dl.fedoraproject.org/pub/epel/epel-release-latest-6.noarch.rpm && rpm -Uvh epel-release-latest-6.noarch.rpm
wget http://rpms.famillecollet.com/enterprise/remi-release-6.rpm && rpm -Uvh remi-release-6*.rpm
vim /etc/yum.repos.d/remi.repo
Under the section that looks like [remi] make the following changes:
[remi]
name=Remi’s RPM repository for Enterprise Linux 6 – $basearch
#baseurl=http://rpms.remirepo.net/enterprise/6/remi/$basearch/
mirrorlist=http://rpms.remirepo.net/enterprise/6/remi/mirror
enabled=1
gpgcheck=1
gpgkey=file:///etc/pki/rpm-gpg/RPM-GPG-KEY-remi
Save the file.
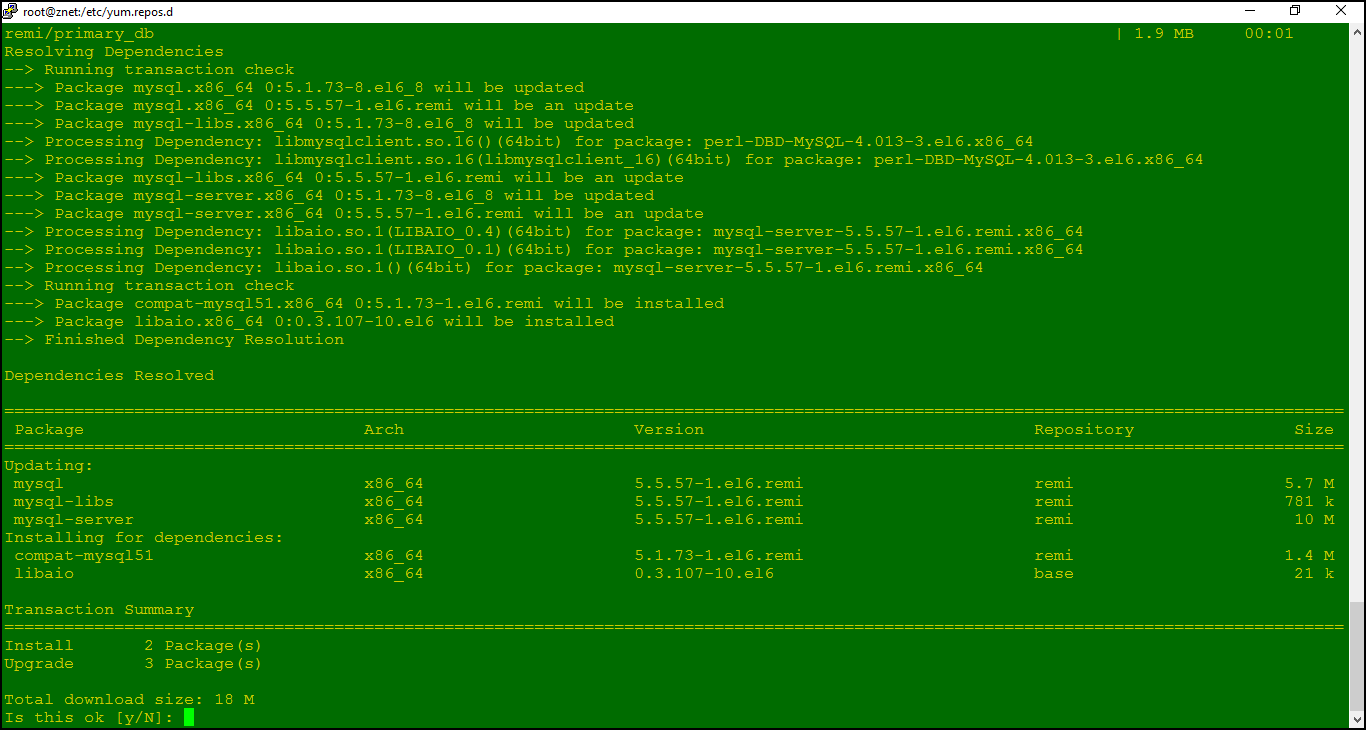
Step6: yum update mysql* -y
image
Once that’s done, you can verify:
rpm -qa | grep mysql

Now we need to update MySQL 5.5 to 5.6.
First we take backup of mysql configuration file and the mysql directory for the security concerns.
For configuration file backup:
cp /etc/my.cnf /etc/my.cnf_bak_`date +%F`
Database directory backup:
mv /var/lib/mysql/ /var/lib/mysql_55
Now download the mysql 5.6 rpm:
wget http://dev.mysql.com/get/Downloads/MySQL-5.6/MySQL-shared-5.6.10-1.el6.x86_64.rpm
wget http://dev.mysql.com/get/Downloads/MySQL-5.6/MySQL-client-5.6.10-1.el6.x86_64.rpm
wget http://dev.mysql.com/get/Downloads/MySQL-5.6/MySQL-server-5.6.10-1.el6.x86_64.rpm

Now stop the mysql service.
/etc/init.d/mysqld stop
Then remove the existing mysql 5.5.
yum remove mysql*
After removing the mysql, run the below commands:
rpm -ivh MySQL-shared-5.6.10-1.el6.x86_64.rpm
rpm -ivh MySQL-client-5.6.10-1.el6.x86_64.rpm
rpm -ivh MySQL-server-5.6.10-1.el6.x86_64.rpm
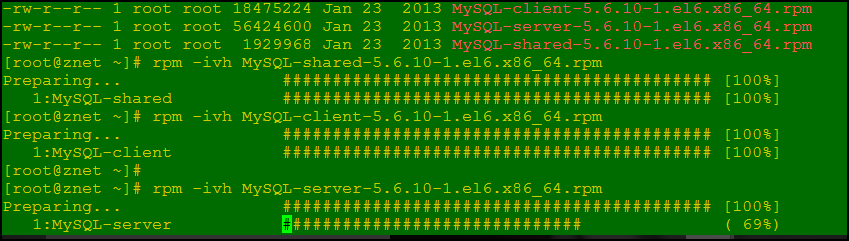
MySQL 5.6 Server Installation log:
Preparing… ########################################### [100%]
1:MySQL-server ########################################### [100%]
2017-09-09 11:51:26 0 [Warning] TIMESTAMP with implicit DEFAULT value is deprecated. Please use –explicit_defaults_for_timestamp server option (see documentation for more details).
2017-09-09 11:51:26 1908 [Note] InnoDB: The InnoDB memory heap is disabled
2017-09-09 11:51:26 1908 [Note] InnoDB: Mutexes and rw_locks use GCC atomic builtins
2017-09-09 11:51:26 1908 [Note] InnoDB: Compressed tables use zlib 1.2.3
2017-09-09 11:51:26 1908 [Note] InnoDB: CPU does not support crc32 instructions
2017-09-09 11:51:26 1908 [Note] InnoDB: Using Linux native AIO
2017-09-09 11:51:26 1908 [Note] InnoDB: Initializing buffer pool, size = 128.0M
2017-09-09 11:51:26 1908 [Note] InnoDB: Completed initialization of buffer pool
2017-09-09 11:51:26 1908 [Note] InnoDB: The first specified data file ./ibdata1 did not exist: a new database to be created!
2017-09-09 11:51:26 1908 [Note] InnoDB: Setting file ./ibdata1 size to 12 MB
2017-09-09 11:51:26 1908 [Note] InnoDB: Database physically writes the file full: wait…
2017-09-09 11:51:26 1908 [Note] InnoDB: Setting log file ./ib_logfile101 size to 48 MB
2017-09-09 11:51:27 1908 [Note] InnoDB: Setting log file ./ib_logfile1 size to 48 MB
2017-09-09 11:51:27 1908 [Note] InnoDB: Renaming log file ./ib_logfile101 to ./ib_logfile0
2017-09-09 11:51:27 1908 [Warning] InnoDB: New log files created, LSN=45781
2017-09-09 11:51:27 1908 [Note] InnoDB: Doublewrite buffer not found: creating new
2017-09-09 11:51:27 1908 [Note] InnoDB: Doublewrite buffer created
2017-09-09 11:51:27 1908 [Note] InnoDB: 128 rollback segment(s) are active.
2017-09-09 11:51:27 1908 [Warning] InnoDB: Creating foreign key constraint system tables.
2017-09-09 11:51:27 1908 [Note] InnoDB: Foreign key constraint system tables created
2017-09-09 11:51:27 1908 [Note] InnoDB: Creating tablespace and datafile system tables.
2017-09-09 11:51:27 1908 [Note] InnoDB: Tablespace and datafile system tables created.
2017-09-09 11:51:27 1908 [Note] InnoDB: Waiting for purge to start
2017-09-09 11:51:27 1908 [Note] InnoDB: 1.2.10 started; log sequence number 0
A random root password has been set. You will find it in ‘/root/.mysql_secret’.
2017-09-09 11:51:28 1908 [Note] Binlog end
2017-09-09 11:51:28 1908 [Note] InnoDB: FTS optimize thread exiting.
2017-09-09 11:51:28 1908 [Note] InnoDB: Starting shutdown…
2017-09-09 11:51:29 1908 [Note] InnoDB: Shutdown completed; log sequence number 1625977
2017-09-09 11:51:29 0 [Warning] TIMESTAMP with implicit DEFAULT value is deprecated. Please use –explicit_defaults_for_timestamp server option (see documentation for more details).
2017-09-09 11:51:29 1931 [Note] InnoDB: The InnoDB memory heap is disabled
2017-09-09 11:51:29 1931 [Note] InnoDB: Mutexes and rw_locks use GCC atomic builtins
2017-09-09 11:51:29 1931 [Note] InnoDB: Compressed tables use zlib 1.2.3
2017-09-09 11:51:29 1931 [Note] InnoDB: CPU does not support crc32 instructions
2017-09-09 11:51:29 1931 [Note] InnoDB: Using Linux native AIO
2017-09-09 11:51:29 1931 [Note] InnoDB: Initializing buffer pool, size = 128.0M
2017-09-09 11:51:29 1931 [Note] InnoDB: Completed initialization of buffer pool
2017-09-09 11:51:29 1931 [Note] InnoDB: Highest supported file format is Barracuda.
2017-09-09 11:51:29 1931 [Note] InnoDB: 128 rollback segment(s) are active.
2017-09-09 11:51:29 1931 [Note] InnoDB: Waiting for purge to start
2017-09-09 11:51:29 1931 [Note] InnoDB: 1.2.10 started; log sequence number 1625977
2017-09-09 11:51:29 1931 [Note] Binlog end
2017-09-09 11:51:29 1931 [Note] InnoDB: FTS optimize thread exiting.
2017-09-09 11:51:29 1931 [Note] InnoDB: Starting shutdown…
2017-09-09 11:51:31 1931 [Note] InnoDB: Shutdown completed; log sequence number 1625987
A RANDOM PASSWORD HAS BEEN SET FOR THE MySQL root USER !
You will find that password in ‘/root/.mysql_secret’.
You must change that password on your first connect, no other statement but ‘SET PASSWORD’ will be accepted.
See the manual for the semantics of the ‘password expired’ flag.
Also, the account for the anonymous user has been removed.
In addition, you can run:
/usr/bin/mysql_secure_installation
which will also give you the option of removing the test database.
This is strongly recommended for production servers.
See the manual for more instructions.
Please report any problems with the /usr/bin/mysqlbug script!
The latest information about MySQL is available on the web at http://www.mysql.com
WARNING: Found existing config file /usr/my.cnf on the system.
Because this file might be in use, it was not replaced,
but was used in bootstrap (unless you used –defaults-file)
and when you later start the server.
The new default config file was created as /usr/my-new.cnf,
please compare it with your file and take the changes you need.
Now copy the existing configuration and the database directory
mv /etc/my.cnf_bak_`date +%F` /etc/my.cnf
mv /var/lib/mysql /var/lib/mysql_56_clean
cp -R /var/lib/mysql_55 /var/lib/mysql
Now start the mysql:
/etc/init.d/mysql start
Now copy the temporary password:
vi /root/.mysql_secret
Now run below command to set the password:
mysql -u root -p
Enter the temporary password, and then change the password:
SET PASSWORD FOR ‘root’@’localhost’ = PASSWORD(‘enteryourpass’);

Now MySQL 5.6 installed!
You can verify it with:
mysql -V

In case you have any query regarding this writeup or MySQL database, let me know through comments section. I’ll be happy to help.
Read details in a report by Forrester.
Services ZNetLive offer:
