
Windows Server 2012 is the server version of Windows 8 and is a successor of Windows Server 2008 R2. It was made available to the customers from September 4, 2012. Here’s the step by step procedure of Windows server 2012 installation-
Step 1: Firstly, insert the ISO image or DVD in the CD/DVD drive or set the first boot CD/DVD from BIOS and when the message ‘Press any key to boot from CD or DVD’ appears, press ‘Enter’ to boot from the setup.
Step 2: You need to wait for some time for the system to load the configuration files, depending upon its hardware capacity.

Step 3: Once the files get loaded, then setup starts and the next screen prompts for language & keyboard selection.

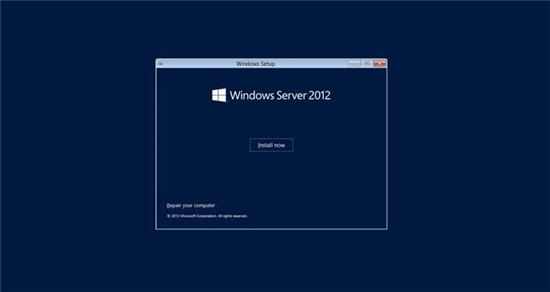
Step 4: Following that, click on the ‘Next’ button and you get another screen with ‘Install Now’ tab. Click on this tab. Step 4: Following that, click on the ‘Next’ button and you get another screen with ‘Install Now’ tab. Click on this tab.
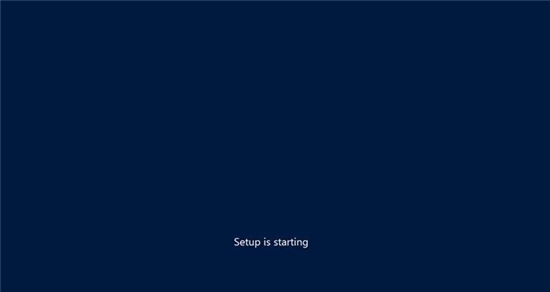
Step 5: This shows the message that ‘Setup is starting’. Wait till loading completes.
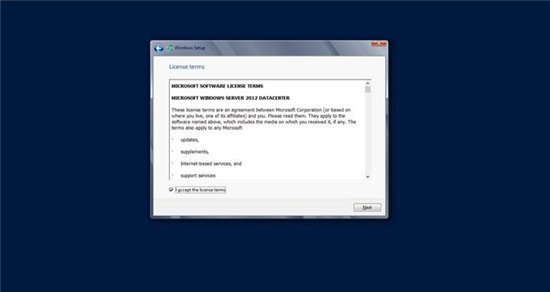
Step 6: Then next comes the license and acceptance policy tab. Click on the ‘I accept’ check box to proceed further.
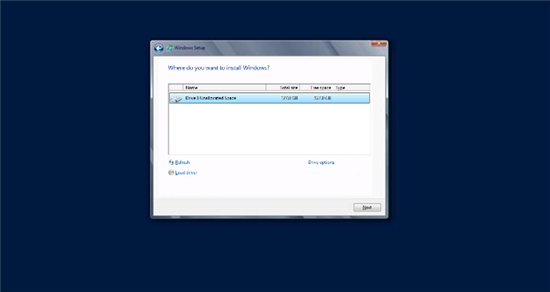
Step 7: Now next comes the drive or partition management graphical environment. So create the partition as per requirement and allocate disk space accordingly. Here I’m going to create only one partition and will allocate all HDD disk space to C: drive.
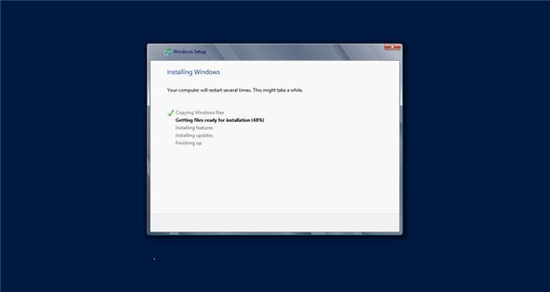
Step 8: Now select the C: partition and click on Next. This will start the OS installation and setup will begin. This may take some time.
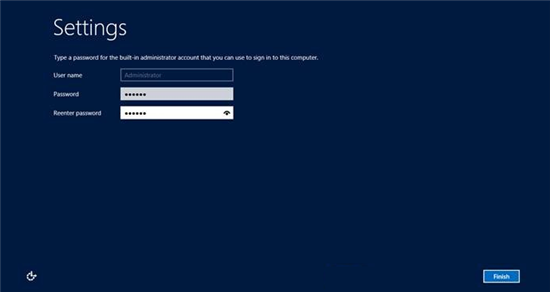
Step 9: After setup completion, restart the server and this will prompt for admin username and password. Enter them and proceed further.
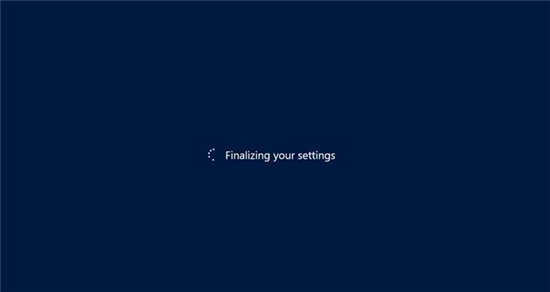
Step 10: Once done, this will take some time in finalizing your setup.
Step 11: After it’s done, press Ctrl + Alt + Del to login to your Windows server and use password that you used in setup. You’ll be able to see the server screen. That’s it ! 🙂

Technical differences between Linux and Windows Servers‘ installation
-
Both OS support different file systems. Whereas Linux supports Ext 3, 4, Windows support NTFS.
-
During the time of OS installation partition, we can make LVM and RAID partition in Linux server but we cannot create them in windows server during OS installation time.
-
Both OS bootloaders are different.
-
Windows totally has graphical environment for installation, while in Linux we can install OS from command line also.
-
We need at least 1 GB RAM to install Windows server to load graphics in a proper manner. But in case of Linux, we can install OS with less than 500 MB RAM (from the command line).
-
For Windows, we need to enter key to install it. But Linux is an open source software and is totally free, so Linux OS can be run without entering key.
-
Windows kernel was developed by Microsoft whereas Linux kernel was developed by Linus Torvalds.
-
Linux supports .rpm or .dat format for S/W whereas Windows support .ext.
-
We can install required .rpm during the time of installation in Linux but in Windows we cannot do that since it’s closed source.
Similarities between Linux and Windows OS installation
-
Both OS can be installed with graphical environment.
-
Both OS require extra partition to store the system configuration files.
-
Both OS support English language.
-
Both Linux and Windows can host PHP and fast CGI website. So both packages can be installed during installation time.
-
Both can be run in trouble shooting mode.
General issues during OS installation
-
Hardware dependency.
-
Understanding the hard disk partition scheme.
-
In Linux installation, proper guidance and in-depth knowledge of concepts is needed.
Conclusion: Linux is totally open source so we can modify it as per our requirement and no reboot is required after each single installation, so my favorite is Linux installation.
Services ZNetLive offer:
Managed WordPress Hosting India
If you have any feedback regarding this write-up, please write in comments below.
